Contract Principal Consultant and Technical Lead

Category: blog (Page 1 of 3)

Better Spring Boot With AI

This post shows Java developers how to capture their Spring Boot engineering standards in a reusable Agent Skill.

Claude Code or GitHub Copilot can then apply those instructions to relevant code-generation tasks, helping the resulting code follow the same conventions consistently.

Define the standards once, and future prompts can benefit from the same guidance without you having to repeat it each time.

Although the process is the focus of this post, you can inspect the generated application and the skill in the repository:

View the generated Spring Boot application on GitHub

Claude and Copilot

I used Claude Code for this example, but the same SKILL.md can also be used with GitHub Copilot.

Claude Code discovers personal skills under:

~/.claude/skills/

For GitHub Copilot CLI, personal skills can be stored under:

~/.copilot/skills/

How Agent Skills Work

The process is simple: define your engineering standards once, then let the coding agent apply them whenever a relevant prompt is run.
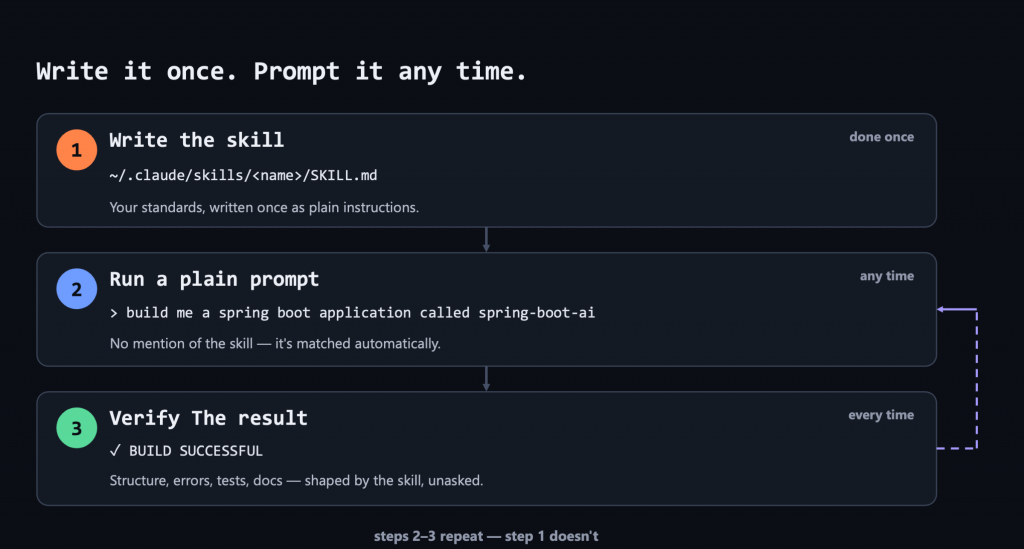
Three-step Agent Skills workflow: write the skill, run a prompt and verify the result.

The skill improves the consistency of the generated code. It does not guarantee correctness or replace engineering judgement.

1. Write the skill

Each skill is a directory containing a file named exactly SKILL.md. The capitalisation matters.

For this example, our personal Claude Code skill is stored here:
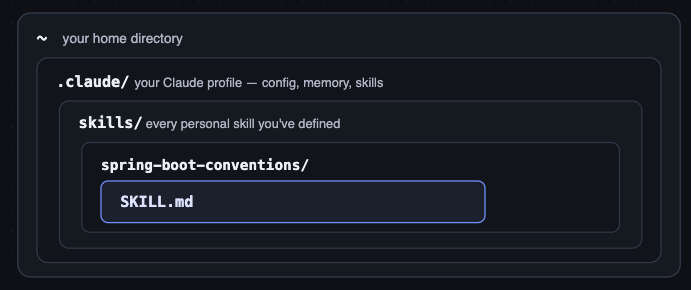
File structure showing the Spring Boot conventions SKILL.md under the Claude skills directory.

Every SKILL.md begins with YAML frontmatter containing a name and description:

---
name: spring-boot-conventions
description: Apply these conventions when creating or modifying Java Spring Boot applications.
---

The description is particularly important because it helps the agent decide when the skill is relevant and should be loaded.

The rest of the file describes your conventions in plain English. It can cover anything you care about: language and build tools, application structure, dependency injection, data access, testing, observability, documentation, Docker and CI/CD.

You do not have to write the first draft manually. You can describe your standards to the coding agent, ask it to create the SKILL.md, and then review and refine the result.

For this deliberately cut-down example, the skill covers the following areas:
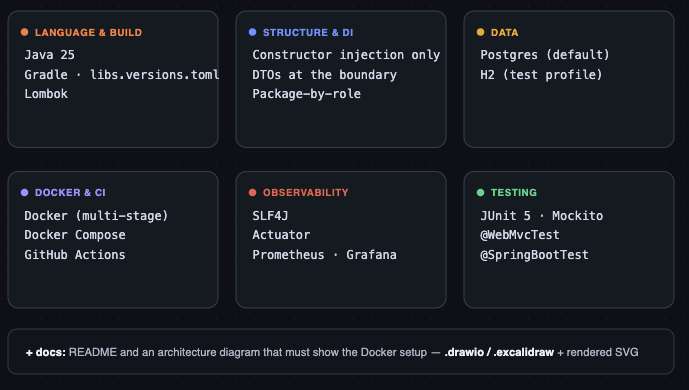
Spring Boot Agent Skill covering build, architecture, persistence, Docker and CI, observability and testing conventions.

Here’s a snippet – you just describe in plain English. I usually tell the prompt what I want, and have it generate the file.

## Structure & Dependency Injection

- Java 25, Gradle, with dependency versions in a `libs.versions.toml` version catalog rather than scattered in `build.gradle.kts`. Include Lombok.
- Inject dependencies through the constructor. Use `@RequiredArgsConstructor` on `private final` fields. No `@Autowired` fields, no setters.
- Use the right annotation for the job: `@Service`, `@Repository`, `@RestController`, `@Configuration`. Don't just use `@Component` for everything.
- Organize packages by role: `controller`, `service`, `repository`, `model`, `dto`, `exception`, `config`, under `com.johndobie.<app>`.
- Services should be stateless. Don't store per-request data in a service's fields.

The complete skill is available here:
View the complete Spring Boot conventions skill

2. Run a prompt

Once the skill exists, you normally do not need to invoke it explicitly. The agent decides when to load it by matching your request against the skill’s description.

You can still mention the skill by name if you want to remove any ambiguity.

For this demonstration, I deliberately used a minimal prompt:

build me a spring boot application called spring-boot-ai

The prompt is intentionally vague. The skill supplies the engineering conventions; a real application prompt would still need to describe its business requirements.

Claude Code matched the request to the spring-boot-conventions skill and applied its instructions while generating the application.
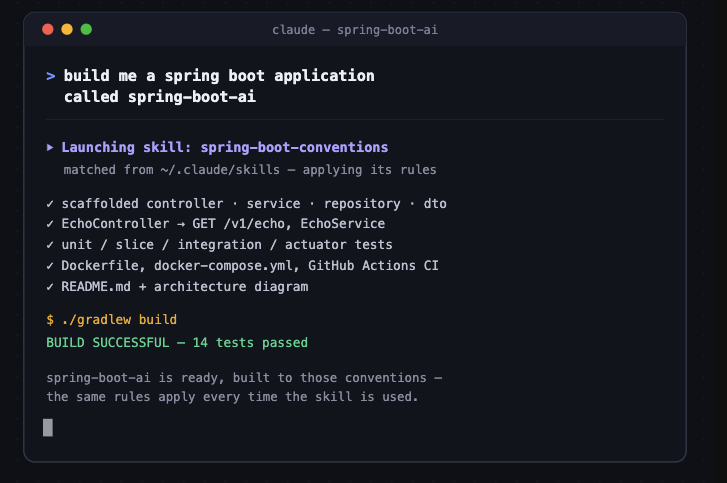
Claude Code generating the spring-boot-ai application using the Spring Boot conventions skill.

What did the skill change?

The generated project reflects standards that were defined in the skill rather than repeated in the prompt. It includes:

  • Build: Java 25 with a Gradle version catalogue
  • Architecture: Constructor injection, DTO boundaries and separated application layers
  • Persistence: PostgreSQL with an H2 test profile
  • Testing: JUnit 5, Mockito, MockMvc and H2-backed integration tests
  • Delivery: Docker, Docker Compose and GitHub Actions
  • Observability: Spring Boot Actuator, Prometheus and Grafana
  • Documentation: README and architecture diagram

You can inspect the result here:
View the generated application

3. Verify the result

Now treat the result exactly as you would any other contribution:

  • Review the generated code and configuration
  • Run the build and test suite
  • Inspect the dependencies
  • Start the application
  • Check that the architecture matches the intended design
  • Refine anything that does not meet your standards

The skill improves consistency, but it does not replace code review, testing, security checks or engineering judgement.

That is the important point: AI-generated code does not remove engineering responsibility. You can—and should—take ownership of it just as you would code written from scratch.

That’s all, folks! 🐷

Next Steps

This was deliberately a basic example. A real skill can contain much more detailed guidance, examples, templates, reference material and validation scripts.

You can also split your standards into several focused skills that work together. For example:

  • Spring Boot application structure
  • REST API conventions
  • Database and migration standards
  • Testing strategy
  • Observability
  • Docker and deployment
  • CI/CD
  • Security

This makes the guidance easier to maintain and allows the coding agent to load only the skills relevant to the current task.

People and organisations are already publishing reusable skills. Before importing one, treat it as you would any other code or development tool: review the SKILL.md and inspect any scripts or resources it contains.

References

Anthropic: Agent Skills overview
GitHub: About Agent Skills
GitHub: Adding Agent Skills for GitHub Copilot CLI
GitHub Awesome Copilot: Java Spring Boot skill
Testing Spring Boot Microservices Cheat Sheet

A working application with comprehensive unit and integration tests that serves as a cheat sheet for testing Spring Boot Microservices.

Introduction

I’ve done every type of testing available for Spring Boot Microservices. The patterns are always the same, but sometimes, I forget the details.
You can get AI to write each of the bits individually, but I like having a working build I can play with.

So, I initially set up a simple application and some example tests to remind myself of the configuration and syntax I tend to use.

It’s not a traditional cheat sheet, which would be pages long and too complex.
Instead, it has many working tests as examples to show what you need to do.

I’ve deliberately used different styles and techniques because that tends to be what you encounter in real projects.

It has tests for each component needed in a typical application and checks built-in features such as swagger, health, and info endpoints.

Additionally, it is configured to measure code coverage with Jacoco.

target/site/jacoco

I love the simplicity of Jacoco, and you can only admire its 90’s styling.

Building The Spring Boot Testing Application.

The best way to use this as a cheat sheet is to check it out locally and build it.
https://github.com/johndobie/spring-boot-testing.git

git clone https://github.com/johndobie/spring-boot-testing.git
mvn clean test

Spring Boot Application Architecture.

Understanding the application’s architecture will help you understand why the tests are structured.
It’s pretty standard, if a bit Mickey Mouse regarding the lack of business logic, but it’s close enough.

The remote API is https://jsonplaceholder.typicode.com/posts
This was chosen because it is simple and doesn’t require any authentication.

Component Tests

I won’t worry too much about terminology and have kept things simple.
The tests generally cover one component, starting from its inputs and mocking any dependencies – pretty standard.

For example, a controller test looks like this.

Testing Spring Boot Microservices Cheat Sheet Unit Tests

In the test code, you will see the component under test and a @MockitoBean for each dependency. In this case, the PlaceHolderController is under test, and the PlaceHolderService will be mocked.
@WebMvcTest(PlaceholderController.class)
public class PlaceholderControllerMockMvcTest {
   
    @MockitoBean
    private PlaceholderService placeholderService;
}

Integration Tests

Some of the more complex tests I have marked as integration tests.
These either use something like an in-memory database or test across more than one component.

@DataJpaTest
@AutoConfigureTestDatabase
public class MessageRepositoryIntegrationTest {
 
    @Autowired
    private MessageRepository messageRepository;
}

Test Style

The tests are written in a typical Given When Then (GWT) or Arrange Act Assert(AAA) style with three blocks.

@Test
public void testGetPosts() {
    RemotePost[] remotePosts = TestDataHelper.getRemotePosts();
    given(placeholderClient.getPosts()).willReturn(Arrays.asList(remotePosts));
    
    List<Post> posts = placeholderService.getPosts();
    
    assertThat(posts).isNotEmpty();
    assertThat(posts.size()).isEqualTo(2);
    assertThat(posts.get(0).getTitle()).isEqualTo(TestDataHelper.SAMPLE_TITLE_1);
}

GitHub Builds.

None of this is much use unless it builds.
The builds are here: https://github.com/johndobie/spring-boot-testing/actions

Wrap Up.

The Testing Spring Boot Microservices Cheat Sheet is a work in progress.
There’s a load more tests I can add, and I will add them as I get time.

Links

https://johndobie.com/blog/validation-errors-in-spring-boot-microservices/

https://johndobie.com/blog/git-info-endpoint-in-spring-boot/

https://johndobie.com/blog/java-streams-cheat-sheet-with-examples/

Please, Before Doing A Coding Interview.

Hiring the best talent is key to a great business. Here’s why you should not rely solely on coding interviews when hiring; instead, consider speaking more to candidates.

Introduction

Over recent years, the hiring focus has changed from looking and chatting with candidates to a process designed to quickly deal with as many people as possible.

I feel that coding interviews are now done verbatim without knowing their purpose.

They are often run like the coding equivalent of an ambush. Candidates are suddenly given an unfamiliar topic and told to code it immediately without research or the ability to rely on their normal processes or tools.

If you were devising a way to get the best out of someone, would you choose that?
But somehow, this has become the norm for coding interviews.

In my opinion, a more upfront screening followed by a technical chat will give you a much better view of the person.

Please Know That

Me coding in front of you for the next hour will not

  • Show you whether I am a good coder or not.
    My public code, work history and recommendations are all better indicators.
  • Show how I do my day-to-day work.
    I always prepare before coding; I would never jump in.
    I would generally use Google or AI to help with the small details.
  • Give you an idea of how I solve problems.
    Why would you think that?
  • Show my true personality.
    It’s not likely when I am nervous and must focus entirely on coding.
  • Show That I am comfortable pairing
    Everyone is comfortable pairing with the right partner.
    Watching me work my way through an exercise is not pairing.

Wouldn’t It Be Better

For you to spend the next hour speaking to me and you will know

  • If I am the right person to drive your project into production.
  • If I will focus on the bigger picture and catch what other people might miss.
  • How I support and mentor my teams
  • If I can calmly overcome project issues and keep moving forward.
  • How comfortable I am talking to and building rapport with stakeholders.
  • Whether I am comfortable doing architecture and complex low-level design.
  • If I am more of a big-picture thinker or someone who lives in the weeds.
  • Whether I am comfortable presenting my team’s work.
  • How comfortable I am defining and refining tickets if needed to drive them.
  • How I feel about code quality and how I ensure it’s built in from the start
  • How I build tests at multiple levels to make sure the system is tested properly
  • What I think about full cycle development and supporting systems in prod.
  • The work you are looking for me to do is a good match.
  • How I would solve a problem you are trying to solve.
  • Whether I like to tackle the big problems first or last.
  • What I think about Microservices vs Monoliths.
  • What branching patterns I tend to use.
  • How I approach complex problems
  • What I think about frameworks vs. coding things myself?
  • What I think about clean code, SOLID et al.
  • Whether I like DevOps as well as coding?
  • Whether I prefer NoSQL or SQL?
  • ..

Or anything else you want to know.

You’ll learn much more about me, my skills, and my personality during this time.

The Choice is yours

So before you decide to let me loose on your project, ask yourself this.

Is it more important that I can

  • Code an unfamiliar problem in a pressured and unfamiliar setting.
    Remember low-level coding syntax
    or
  • Build your system in the best way possible after considering all the options.
    Fix your production outage under pressure.
    Have the right temperament to support the delivery of your project.
    See the bigger picture and catch what other people might miss.
    Dive into the low-level detail whenever needed.

If You Must

If you’re sure that a coding interview is the best way for you to go, you can do a few things to get the best out of your candidates.

  • Chat a bit first and put them at ease.
    Don’t just throw a problem at them – that doesn’t happen in the workplace.
    Be human about this – explain that the process is not to catch them out, and you want them to do well.
  • Consider Letting Them Know The Problem In Advance
    This takes the effort away from understanding the context.
    It lets them concentrate on showing you how they work.
  • Consider Letting Them Present Their Own Work
    A candidate can give you a walkthrough of something they’ve done.
    You can always ask them to make additional changes.
    Many places do this by giving a coding challenge that they present.

Wrap Up

Just to be clear, I love coding. I wouldn’t be doing this job at my age if I didn’t.
So I expect people to be able to code, including architects 🙂

But the more I think about coding interviews and how they are conducted, the more I see that they’re not fit for purpose when trying to gauge someone’s ability.

There will always be a place for coding interviews, but you must carefully consider how vital they are, how they are done and where they should be placed in your hiring process. Putting them at the front makes them a blunt tool that will lose good people.

I still think an hour of talking to someone less formally will yield the best results. Making them feel at ease and listening to what they have done in practice will likely tell you all you need to know.

What’s that old saying about two ears and one mouth …..

Spring Boot Microservices With GitHub Actions

Building a Spring Boot Microservice with GitHub Actions is as easy as doing it locally. Create a Microservice and build it on Github in under 5 minutes.

Introduction

One of the best things that happened to Java was the mainstream adoption of testing and CI/CD pipelines. This started many engineering practices and ultimately banished the dreaded “Golden Machine” anti-pattern.

However, it generally relied on a CI/CD pipeline to be available. What I like about GitHub actions is that no setup is required. You create the GitHub action file locally and push it. The remote build then starts working.

So now you can have a remote CI build from your first commit.

The Four Steps

You won’t find an easier blog than this. It consists of just four steps.

Continuous improvement dictates that once you know the steps and understand what they do, you must optimise them.

So, at the end of this blog, there is a script you can run to do all this.

Code

An example of the code and the complete build can be found here.
https://github.com/johndobie/spring-boot-github-action

Step 1 – Create a GitHub Repo.

You’ll need the GitHub CLI installed locally if you want to do this from the command line. https://cli.github.com

Once installed, it is as simple as running the following commands

Create a new repository in Github and make a local copy
gh repo create spring-boot-action --public --clone
cd spring-boot-action

Otherwise, create and check out a repo as you would normally.

Step 2 – Use Spring Initializr to create your code.

Spring Initializr allows you to create the skeleton code for your Spring Boot Microservices, and we will use it to make a skeleton to test our action.

https://start.spring.io/

Most people use Spring Initializr from the web interface or directly in their IDE, but you can use it from the command line.

The commands below will create a simple Spring Application that you can use for your Microservices and push to GitHub.

Create a new Spring Boot project and push the code
curl https://start.spring.io/starter.tgz -d dependencies=web,actuator,devtools -d type=maven-project -d language=java -d bootVersion=3.4.2 -d groupId=com.example -d artifactId=springboot-github-action -d name=springboot-github-action -d packageName=com.example.github.action -d baseDir=spring-boot-action | tar -xzvf -
git add --all
git commit -m "add spring boot code"

It will create the following Skelton code.

You can build it as follows.

Bash
mvn clean install
..
..
[INFO] ------------------------------------------------------------------------
[INFO] BUILD SUCCESS
[INFO] ------------------------------------------------------------------------
[INFO] Total time:  5.135 s
[INFO] Finished at: 2025-02-17T14:05:41Z
[INFO] ------------------------------------------------------------------------

We want to recreate this local build remotely on GitHub.

Step 3 – Download a GitHub Action.

There is a standard GitHub action that will replicate the local Maven build on GitHub. You can use curl to download it as below.

Create the Github Workflow directory and download the Github Action
mkdir -p .github/workflows
curl -o .github/workflows/maven.yml https://raw.githubusercontent.com/actions/starter-workflows/refs/heads/main/ci/maven.yml

This action looks like this

YAML
# This workflow will build a Java project with Maven, and cache/restore any dependencies to improve the workflow execution time
# For more information see: https://docs.github.com/en/actions/automating-builds-and-tests/building-and-testing-java-with-maven

# This workflow uses actions that are not certified by GitHub.
# They are provided by a third-party and are governed by
# separate terms of service, privacy policy, and support
# documentation.

name: Java CI with Maven

on:
  push:
    branches: [ $default-branch ]
  pull_request:
    branches: [ $default-branch ]

jobs:
  build:

    runs-on: ubuntu-latest

    steps:
    - uses: actions/checkout@v4
    - name: Set up JDK 17
      uses: actions/setup-java@v4
      with:
        java-version: '17'
        distribution: 'temurin'
        cache: maven
    - name: Build with Maven
      run: mvn -B package --file pom.xml

    # Optional: Uploads the full dependency graph to GitHub to improve the quality of Dependabot alerts this repository can receive
    - name: Update dependency graph
      uses: advanced-security/maven-dependency-submission-action@571e99aab1055c2e71a1e2309b9691de18d6b7d6

You’re going to change lines 13 and 14 to this

YAML
on:
  push:
    branches: [ "**" ]
  pull_request:
    branches: [ "**" ]

and delete lines 32-35

YAML

    # Optional: Uploads the full dependency graph to GitHub to improve the quality of Dependabot alerts this repository can receive
    - name: Update dependency graph
      uses: advanced-security/maven-dependency-submission-action@571e99aab1055c2e71a1e2309b9691de18d6b7d6

That’s your action, ready to go.

It will simply check out the code and build it on GitHub with Maven and Java 17.

Step 4 – Push Your Code and Check Your Build.

Commit and push the code including the Github Action
git add --all
git commit -m "add github action"
git push --set-upstream origin master

The moment of truth – when you push your code, you should see your first build.

Go to the actions tab on GitHub.

https://github.com/johndobie/spring-boot-github-action/actions

https://github.com/johndobie/spring-boot-github-action/actions

From now on, a new build will run every time you commit.

Scripting The Steps

Now that you know and understand the steps, we can optimise the process.
You can see a full script here that will perform all the above steps.

https://github.com/johndobie/spring-boot-github-action/blob/master/script/create-application.sh

Bash
./create-application.sh <repository_name>

Follow On

We have not gone through the ins and outs of GitHub actions but instead have concentrated on how to create your first one.

The next step is to look at all they have to offer.

https://docs.github.com/en/actions/use-cases-and-examples/building-and-testing/building-and-testing-java-with-maven

Other Blogs

If you liked this blog, you may be interested in these other blogs.

https://johndobie.com/blog/testing-spring-boot-microservices-cheat-sheet/

https://johndobie.com/blog/validation-errors-in-spring-boot-microservices/

Versioning Spring Boot Microservices.

In 10 minutes, you can publish a model jar that as well as versioning Spring Boot Microservices, gives clients a simple way to call them.

Overview

If you want to make life easy for your clients, it’s important to give them an easy way to access your Microservices. This is especially important if you have lots of clients – otherwise, they all have to build their own.

One simple way to do that is to provide them with a model jar that contains all of the model classes needed to access those services.

This model jar can be versioned whenever your services change and all your clients have to do is update the version in their build to get the latest interface.

Versioning Spring Boot Microservices Code

You can download the code from here and follow the readme instructions to run it.

git clone https://github.com/johndobie/spring-boot-versioning

Part 1 – Creating The Model.

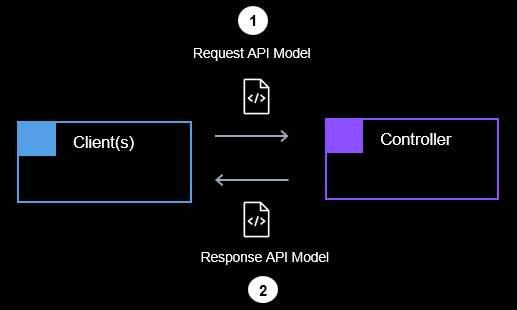
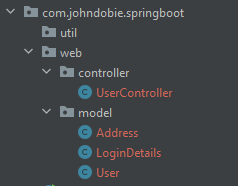
Whenever you build Microservices in Spring Boot you will end up with some request and response model classes that are passed into your controllers.

It is these classes that a client will use to access your services.

Versioning Spring Boot Microservices Model

In the Java world, your code will look something like the above with the model classes in one package. These are the classes that need to give to your clients.

These classes make it easy for them to create the objects needed by your API.

We can tell Maven to package only those classes in a special model jar with a simple change to the pom.xml

<plugin>
    <groupId>org.apache.maven.plugins</groupId>
    <artifactId>maven-jar-plugin</artifactId>
    <executions>
        <execution>
            <id>package-model</id>
            <phase>package</phase>
            <goals>
                <goal>jar</goal>
            </goals>
            <configuration>
                <classifier>model</classifier>
                <includes>
                    <include>**/com/johndobie/springboot/web/model/**</include>
                </includes>
            </configuration>
        </execution>
    </executions>
</plugin>

You can now run a build

mvn clean install

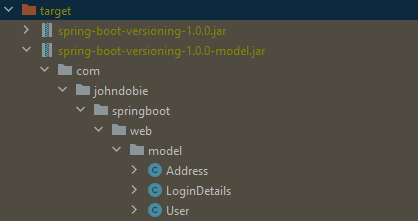
This will produce the standard jar plus a spring-boot-versioning-1.0.0-model jar.

This new jar contains only the model classes required by your clients.
It is also versioned at the same level as your main jar

jar -xvf spring-boot-versioning-1.0.0-model.jar
 inflated: com/johndobie/springboot/web/model/Address.class
 inflated: com/johndobie/springboot/web/model/LoginDetails.class
 inflated: com/johndobie/springboot/web/model/User.class

Using The Model Jar as a Client.

Clients can import your model classes in the standard Maven way and use them with any client technology they want.

The key is the classifier which specifies the model

pom.xml
<dependencies>
    ..
    <dependency>
        <groupId>com.johndobie</groupId>
        <artifactId>spring-boot-versioning</artifactId>
        <classifier>model</classifier>
        <version>1.0.0</version>
    </
    dependency>
    ..

Adding Some Clients.

Sometimes in a project, you might also want to provide the clients that make the REST calls. You can do this and publish them in the same way as the model.

Add as many classes or packages as you like.

XML
<classifier>model</classifier>
<includes>
    <include>**/com/johndobie/springboot/web/model/**</include>
    <include>**/com/johndobie/springboot/web/client/**</include>
</includes>

Part 2 – Versioning Spring Boot Microservices

Versioning.

You need to version your API every time you make a change and you need to decide how that version number will change.

There are 2 main types of changes.

  • non-breaking changes
  • breaking changes.

We will go into the differences below, but for now, all you need to know is that you will change the version number depending on the type of change.

Versioning Strategy – just pick something.

Conversations about versioning strategy can get pretty heated, probably at the same level as tabs vs spaces. They require the same treatment which is to “just pick something” and make sure it’s documented.

Versioning Spring Boot Microservices With Semantic Versioning

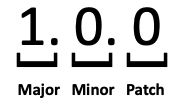
It’s common to use the major and minor versions of semantic versioning.

Versioning Spring Boot Microservices With Semantic Versioning
  • Use Major for breaking changes [b]
  • Use Minor for non-breaking changes [nb]

For a run of 4 breaking [b] and 2 non-breaking [nb] changes you get to version 5.0.0 as below.

1.0.0 -> 2.0.0 [b] -> 3.0.0 [b] -> 3.1.0 [nb] -> 4.0.0 [b] -> 4.1.0 [nb] -> 5.0.0 [b]

This is easy to do in your pipeline using standard Maven versioning.

Because most changes are breaking changes, your major versions may increase rapidly.

Using Patch To Reduce Major Increments

If you look at the common maven repos, the major version number does not go up all that often. With the standard semantic versioning model above, you can see that is not the case.

If you are not happy with lots of major version changes, then just change your strategy.

  • Use Minor for breaking changes [b]
  • Use Patch for non-breaking changes [nb]
  • Only use Major when making a major shift in your API.

For a run of 4 breaking [b] and 2 non-breaking [nb] changes, you will instead get to version 1.4.0

1.0.0 -> 1.1.0 [b] -> 1.2.0 [b] -> 1.2.1 [nb] -> 1.3.0 [b] -> 1.3.1 [nb] -> 1.4.0 [b]

Which Strategy to Use

Just choose one. The important thing is that you make it clear when a breaking change occurs.

The versioning alone will not be enough for this anyway so it’s just an indicator.
It should be accompanied by examples and documentation.

Hopefully, no one is relying on versioning alone!

What is a non-breaking change?

A non-breaking change will not cause an issue for a client when passing the current data.

versioning spring boot microservices non-breaking change

They include

  • adding a new endpoint
  • changing the content of data returned
  • adding a new optional field.

Adding a New Optional Field

This is the most common non-breaking change and it is when you decide to add a new field that a client can optionally pass in the API.

It is non-breaking because the clients can choose to add this field or leave it off.
It doesn’t matter, and it will cause them no issues with what they are passing now.

private String newField;  

What is a breaking change?

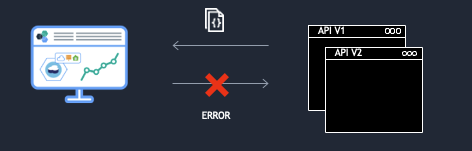
A breaking change will cause an issue for a client when passing the current data.

versioning spring boot microservices breaking change

They include

  • adding a new mandatory field
  • changing the type of an existing field
  • removing an existing field
  • tightening constraints on an existing field
  • changing status codes

Adding a new Mandatory field

Adding a mandatory field is a breaking change.

@NotNull
private String newField;

It relies on your client passing that field in and because your existing clients do not pass this field in, they will get an error.

{"errors":[{"code":"NotNull","detail":"newField may not be null"}]}

Change the type of an existing field.

In most cases changing type will result in your client breaking because their request will be rejected when they pass in the old format.

When using the new model, you should also get a compilation error.

Java
private Integer age;  // age : 15
private String age;   // age : "15"

Tightening a constraint on an existing field.

Reducing the max length of a field from 15 to 10 could break your clients.

Java
@Size(min = 1, max = 15)
private String name; // John Andrew - fine 

@Size(min = 1, max = 10)
private String name; // John Andrew - too long

When passing in a value that was fine before, you end up with this error.

{"errors":[{"code":"Size","detail":"name size must be between 1 and 10"}]}

Removal of an existing field.

The removal of a field may break any system that relies on that field coming back.

Java
  // private Integer age;

Note: This doesn’t have to be a mandatory field
There may be downstream systems that rely on the presence of this field.
If you remove them, you may break them.

The Ignore Unknown Field Debate.

There is sometimes a debate on whether you should ignore unknown fields.
The basis of the objection is generally that a client can misspell a field by accident and not realise it. TBH I believe that should be pretty obvious in testing.

By defining your mapper to ignore unknown fields it means you can add optional fields as non-breaking changes. If you don’t, you can’t. The choice is that simple.

If you decide to ignore unknown fields you can define your mapper as so.

ObjectMapper objectMapper = new ObjectMapper();
objectMapper.configure(FAIL_ON_UNKNOWN_PROPERTIES, false);

Versioning Spring Boot Microservices – Wrap-Up

If you change your services, you should change the version of your model.

Now you can easily update the version in your pom depending on the type of change, and make the new interface available in a model jar.

If you use the above steps in your application, you will be able to deal with most versioning situations with a minimum of fuss.

References

https://semver.org/

https://docs.oracle.com/middleware/1212/core/MAVEN/maven_version.htm

You Might Like

https://johndobie.com/blog/spring-boot-swagger/

https://johndobie.com/blog/feature-flags-in-java-spring/

Blue/Green and Canary Deployments with Spring Boot, Docker and GKE.

This is a simple code example of performing a Blue/Green and a Canary deployment of a Docker-packaged Spring Boot Microservice to Google Kubernetes Engine.

It’s just the basics to get you started in 10 minutes.

Checking out the source

You can check out the source here.

It’s a basic Microservice that echoes a message that you pass.

Bash
git clone https://github.com/johndobie/spring-boot-gke

All of the instructions are also here

https://github.com/johndobie/spring-boot-gke

Run Standalone

Start the Microservice locally and pass it a test message to echo.

Bash
mvn clean spring-boot:run

curl http://localhost:8080/echo?message=testmessage
Host[192.168.0.13] : testmessage

Run In Docker Locally

Create the image and then run the service in docker.

Bash
 docker image build --tag="spring-boot/echo" .
 docker run -p 8080:8080 -t "spring-boot/echo"    

Run In Google Shell

Bash
https://console.cloud.google.com/cloudshell/open
?git_repo=https://github.com/johndobie/spring-boot-gke.git
&page=editor
&open_in_editor=README.md

mvn clean spring-boot:run

Run In Google Shell with Docker

Bash
https://console.cloud.google.com/cloudshell/open?git_repo=https://github.com/johndobie/spring-boot-gke.git&page=editor&open_in_editor=README.md

mvn clean install
docker image build --tag="spring-boot/echo" .
docker run -p 8080:8080 -t "spring-boot/echo"    

Run With Kubernetes

Open Google Shell

Bash
https://console.cloud.google.com/cloudshell/open?git_repo=https://github.com/johndobie/spring-boot-gke.git&page=editor&open_in_editor=README.md

Create and set the project

Bash
gcloud projects create spring-boot-kubernetes-echo --name="Spring Boot Echo on GKE"
gcloud config set project spring-boot-kubernetes-echo

export PROJECT_ID=”$(gcloud config get-value project -q)”

gcloud projects list
gcloud beta billing projects link spring-boot-kubernetes-echo --billing-account 003146-4D6988-3DC95C

Create the Docker Image

Bash
gcloud services enable containerregistry.googleapis.com

docker build -t echo-container-image .
docker tag echo-container-image gcr.io/spring-boot-kubernetes-echo/echo:v1
docker push gcr.io/spring-boot-kubernetes-echo/echo:v1

Create the Kubernetes cluster

Bash
gcloud services enable compute.googleapis.com container.googleapis.com

gcloud container clusters create echo-kubernetes-cluster \
  --num-nodes 4 \
  --machine-type n1-standard-1 \
  --zone us-central1-c

Deploy The Application

Bash
cd src/main/docker
kubectl apply -f deploy-echo-v1.yaml
or   
kubectl create deployment echo-deployment --image=gcr.io/spring-boot-kubernetes-echo/echo:v1

kubectl get deployments 
kubectl get pods

Create a load balancer and expose the service

Bash
kubectl expose deployment echo-deployment 
        --type=LoadBalancer --port 80 --target-port 8080

kubectl get svc
NAME              TYPE           CLUSTER-IP      EXTERNAL-IP    PORT(S)        AGE
echo-deployment   LoadBalancer   10.59.247.132   35.222.75.46   80:31383/TCP   80s

Use the external address to access the service 

http://35.222.75.46/echo?message=test

Scale the pods up or down

Bash
kubectl scale deployment echo-deployment --replicas=3
kubectl get pods
kubectl scale deployment echo-deployment --replicas=1
kubectl get pods

Tear The Project Down

Bash
gcloud projects delete spring-boot-kubernetes-echo -q

All of the instructions are in the readme above.

Java Streams Cheat Sheet With Examples

The world’s simplest Java streams cheat sheet with code examples.

Introduction

This is a very simple list of examples for Java streams to help when you forget the syntax 😉.

Running The Code

You can download and run the source code as follows.

git clone https://github.com/johndobie/playground.git
mvn clean test

Intermediate Operations

Definitions

Stream<Integer> integerStream = Stream.of(1,2,3,4,5,6,7,8,9);

private Function<Integer, Integer> triple = (value) -> value * 3;
private Predicate<Integer> isGreaterThanFive() { return i -> (i > 5); }

Map

@Test
void testMap() {
    Stream<Integer> mappedStream = integerStream.map(triple);
    assertThat(mappedStream).containsExactly(3,6,9,12,15,18,21,24,27);
}

FlatMap

@Test
void testFlatMap() {
    List<String> names = Arrays.asList("john", "emma");
    List<Character> characterList = names.stream().flatMap(x -> x.chars().mapToObj(i -> (char) i)).collect(Collectors.toList());
    assertThat(characterList).containsExactly('j', 'o', 'h', 'n', 'e', 'm', 'm', 'a');
}

Filter

@Test
void testFilter() {
    List<Integer> integerList = integerStream.filter(isGreaterThanFive()).collect(Collectors.toList());
    assertThat(integerList .size()).isEqualTo(4);
    assertThat(integerList ).contains(6,7,8,9);
}

Peek

@Test
void testPeek() {
    List<Integer> integerList = integerStream.peek(System.out::println)
                                             .map(triple)
                                             .peek(System.out::println)
                                             .collect(Collectors.toList());
}

Limit

@Test
void testLimit() {
    Stream<Integer> limitStream = integerStream.limit(5);
    assertThat(limitStream).containsExactly(1,2,3,4,5);
}

Skip

@Test
void testSkip() {
    Stream<Integer> skipStream = integerStream.skip(5);
    assertThat(skipStream).contains(6,7,8,9);
}

Distinct

@Test
void testDistinct() {
    Stream<Integer> duplicatesStream = Stream.of(1,1,2,2,3,3,3,4);
    List<Integer> distinctList = duplicatesStream.distinct().collect(Collectors.toList());
    assertThat(distinctList).containsExactly(1, 2,  3, 4);
}

Sorted

@Test
void testSorted() {
    Stream<Integer> unsortedStream = Stream.of(5,7,0,2,8,0,4);
    List<Integer> sortedList = unsortedStream.sorted().collect(Collectors.toList());
    assertThat(sortedList).isSorted();
}

Terminating Operations

Definitions

private Stream<Integer> integerStream = Stream.of(1,2,3,4,5,6,7,8,9);

private Predicate<Integer> isGreaterThanFive() { return i -> (i > 5); }

private Function<Integer, Integer> triple = (value) -> value * 3;
private Function<Integer, Integer> plusFive = (value) -> value + 5;
private Function<Integer, Integer> triplePlusFive = triple.andThen(plusFive);

Find Any

@Test
void testFindAny() {
    Optional<Integer> optInt = integerStream.filter(isGreaterThanFive()).findAny();
    assertThat(optInt.get()).isEqualTo(6);
}

All Match

@Test
void testAllMatch() {
    boolean areAllGreaterThanFive = integerStream.allMatch(isGreaterThanFive());
    assertThat(areAllGreaterThanFive).isFalse();
}

Non Match

@Test
void testNoneMatch() {
    boolean areAllGreaterThanFive = integerStream.noneMatch(isGreaterThanFive());
    assertThat(areAllGreaterThanFive).isFalse();
}

Any Match

@Test
void testAnyMatch() {
    boolean areAllGreaterThanFive = integerStream.anyMatch(isGreaterThanFive());
    assertThat(areAllGreaterThanFive).isTrue();
}

Count

@Test
void testCount() {
    long count = integerStream.count();
    assertThat(count).isEqualTo(9);
}

Min With General Comparator

@Test
void testMinWithGeneralComparator() {
    Optional<Integer> optMin = integerStream.min(Comparator.naturalOrder());
    assertThat(optMin.get()).isEqualTo(1);
}

Min With Int Comparator

@Test
void testMinWithIntegerComparator() {
    Optional<Integer> optMin = integerStream.min(Integer::compare);
    assertThat(optMin.get()).isEqualTo(1);
}

Max With Integer Comparator

@Test
void testMaxWithIntegerComparator() {
    Optional<Integer> optMax = integerStream.max(Integer::compare);
    assertThat(optMax.get()).isEqualTo(9);
}

Collect

@Test
void testCollect() {
    List<Integer> integerList = integerStream.collect(Collectors.toList());
    assertThat(integerList).containsExactly(1,2,3,4,5,6,7,8,9);
}

For Each

@Test
void testForEach() {
    List<Integer> tripledIntegerList = integerStream.map(triple).collect(Collectors.toList());
    assertThat(tripledIntegerList).containsExactly(3,6,9,12,15,18,21,24,27);
}

Reduce

@Test
void testReduce() {
    Optional<Integer> sum = integerStream.reduce(Integer::sum);
    assertThat(sum.get()).isEqualTo(45);
}

References.

https://www.oracle.com/technical-resources/articles/java/ma14-java-se-8-streams.html

https://docs.oracle.com/javase/8/docs/api/java/util/stream/Stream.html

Other Blogs You May Like

https://johndobie.com/blog/chatgpt-with-java/

https://johndobie.com/blog/feature-flags-in-java-spring/

Swagger and Spring Boot Microservices

This 5-minute post with code demonstrates a simple solution to documenting your Spring Boot Microservice API with Swagger.

Overview

A very important and often overlooked aspect of API design is documentation.

Swagger is an open standard that takes the manual work out of API documentation. It’s an easy and popular choice in Spring Boot applications.

We will run through the simple steps to add Swagger to any Spring Boot Microservice.

  1. Add the maven dependency.
  2. Create your Microservice API.
  3. Add an interface for the Swagger information

Running The Example

This example uses Spring Boot 3.1.2 and Java 17.
You can download and run the source code as follows.

git clone https://github.com/johndobie/spring-boot-swagger.git
mvn clean install spring-boot:run 

You can then see the results here
http://localhost:8080/swagger-ui/index.html#/

Swagger and Spring Boot Microservices

Implementing Swagger and Spring Boot Microservices

Step 1 – Add the maven dependency

This is pretty simple and requires just the following library:

pom.xml
   <dependency>
      <groupId>org.springdoc</groupId>
      <artifactId>springdoc-openapi-starter-webmvc-ui</artifactId>
      <version>2.1.0</version>
   </dependency>

Step 2 – Create your Microservice API.

Now you can add the swagger annotations directly to your controller, but I find that makes your controller a little untidy. So we are going to create a separate interface and add the Swagger annotations to that.

First, let’s look at a simple controller that echoes a model back to the client.

The model is very simple

public class EchoModel {

    @Size(min = 1, max = 15)
    @NotNull
    private String name;

    @Size(min = 1, max = 30)
    @NotNull
    private String message;
}

The controller is too

public class EchoController implements EchoControllerSwagger {

    public static final String ECHO_MODEL_ENDPOINT = "/echo/model";

    @PostMapping(value = ECHO_MODEL_ENDPOINT)
    public EchoModel echoModel(@RequestBody @Valid EchoModel model) {
        return model;
    }
}

Step 3 – Add a Swagger interface.

Now you could add the swagger annotations directly to your controller, but I find that makes your controller a little untidy. So we are going to create a separate interface and add the Swagger annotations to that.

It’s not very complicated, but it is a little verbose.

@Tag(name = "Echo Microservice", description = "This Microservice will echo the model passed in the response.")
public interface EchoControllerSwagger {

    @Operation(operationId = "EchoController", description = "This is a Description of this API call", summary = "This method will echo its request body")
    @ApiResponse(responseCode = "200", content = @Content(mediaType = "application/json", schema = @Schema(implementation = EchoModel.class)))
    public EchoModel echoModel(@RequestBody @Valid EchoModel model);
}

The @Tag, @Operation and @ApiResponse annotations are enough to get you started.

You then only need to add the new interface to your Controller.

public class EchoController implements EchoControllerSwagger

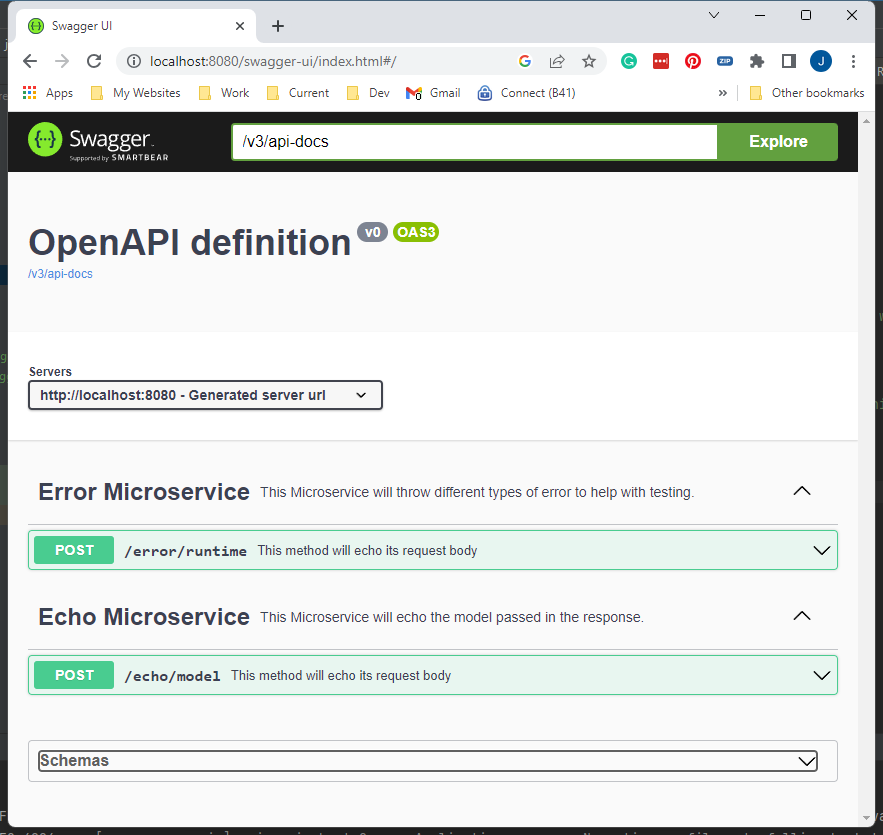
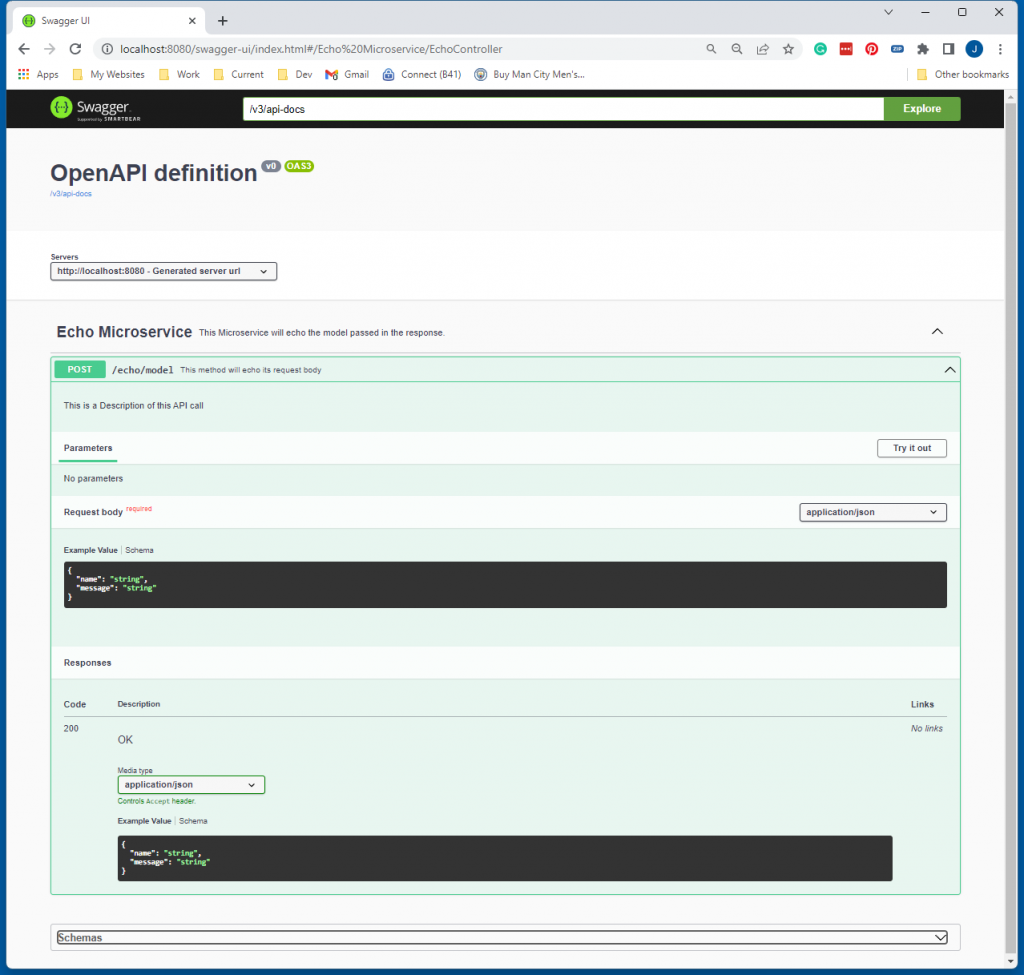
Now you can run your Microservice and see the API:

You can see the endpoint and the parameters required to make a call.

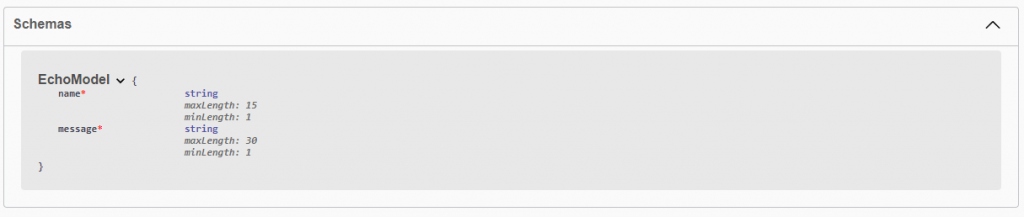
If you take a look at the schema section, you can also see any constraints.

Extracting The Interface.

As well as the UI component we can extract the whole API model as both yaml and json. These can then be used in standard API tooling.

  • The json endpoint is http://localhost:8080/v3/api-docs
  • The yaml endpoint is http://localhost:8080/v3/api-docs.yaml

Next Steps.

In terms of Swagger and Spring Boot Microservices, there are lots of options for the customisation of the API and the way it runs.

You can find more about the specifics below.

https://springdoc.org/

https://springdoc.org/#swagger-ui-properties

Other Blogs You May Like

https://johndobie.com/blog/chatgpt-with-java/

https://johndobie.com/blog/feature-flags-in-java-spring/

Validation and Error Handing in Spring Boot Microservices

This 10-minute post with code demonstrates a simple way to handle API validation and return a list of formatted errors from a Spring Boot Microservice.

Running The Example

You can download and run the source code as follows.

git clone https://github.com/johndobie/spring-boot-error-handling.git
mvn clean install spring-boot:run 

$ curl -X POST http://localhost:8080/echo/model -H 'Content-Type: application/json' -d '{"name":null,"message":"This message is more than 30 characters long ..................................."}'

{"type":"VALIDATION","errors":[{"code":"Size","detail":"message size must be between 1 and 30","source":"echoModel/message"},{"code":"NotNull","detail":"name may not be null","source":"echoModel/name"}]}

Error Handling in Spring Boot Microservices

When building a service it is essential to be able to send back useful error information that can be used to diagnose any issues or be shown to clients.

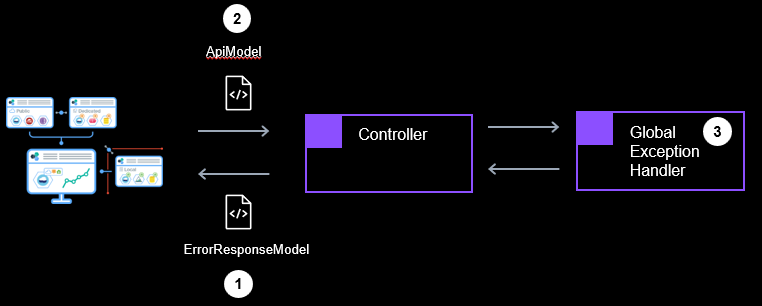
There are 3 steps to the solution:

Errors in Spring Boot Microservices Overview
  1. Define a custom error response model.
  2. Define the API model you want to validate.
  3. Define a Global Exception Handler and customise for each exception.

Your microservice will then return errors of all types in the following structure.

{
  "type": "VALIDATION",
  "errors": [
    {
      "code": "NotNull",
      "detail": "name may not be null",
      "source": "echoModel/name"
    },
    {
      "code": "Size",
      "detail": "message size must be between 1 and 30",
      "source": "echoModel/message"
    }
  ]
}

Building The Solution

Step 1 – Define a custom error format

This could not be easier, requiring only that you define two simple POJOs.
The first is the structure you want to send back the main error details

ErrorModel.java
@Builder
@Data
@NoArgsConstructor
@AllArgsConstructor
public class ErrorModel {

    private String code;
    private String detail;
    private String source;

}

The second is a container for a list of those errors plus any additional fields.
In our case, we will add a type field.

ErrorResponseModel.java
@Data
@Builder
@NoArgsConstructor
@AllArgsConstructor
public class ErrorResponseModel {

    public String type;

    public List<ErrorModel> errorModels;
}

The two of these will form the overall error structure.

Step 2 – Define the API Model.

We are going to create a very simple Microservice endpoint that will take the following model as input, and return the same thing.

EchoModel.java
@Data
@Builder
@NoArgsConstructor
@AllArgsConstructor
public class EchoModel {

    @Size(min = 1, max = 15, message = "Name should be between 1 and 15")
    @NotNull
    private String name;

    @Size(min = 1, max = 30)
    @NotNull
    private String message;
}

However, we want to make sure an error is raised if either is null, or the above size limits are exceeded.

To enable this we create a controller endpoint that takes that model as input and make sure we annotate that method with @Valid.

Java
@RestController
public class EchoController {

    public static final String ECHO_MODEL_ENDPOINT = "/echo/model";
    
    @PostMapping(value = ECHO_MODEL_ENDPOINT)
    public String Mapping(@RequestBody @Valid EchoModel model) {

        return model.getMessage();
    }
}

This annotation makes Spring check the model whenever it receives a request.

So let’s just hit that code with an empty body.

Bash
$ curl -X POST http://localhost:8080/echo/model -H 'Content-Type: application/json' -d '{"name":null,"message":"This message"}'

{"timestamp":"2023-07-19T15:33:47.602+00:00","status":400,"error":"Bad Request","message":"","path":"/echo/model"}

By default, spring throws the following MethodArgumentNotValidException.

Bash
Resolved [org.springframework.web.bind.MethodArgumentNotValidException: Validation failed for argument [0] in public java.lang.String com.johndobie.springboot.
web.controller.EchoController.Mapping(com.johndobie.springboot.web.model.EchoModel): [Field error in object 'echoModel' on field 'name': rejected value [null]; codes [NotNull.echoModel.name,NotNull.name,NotNull.java.lang.String,NotNull]; arguments [org.springframework.context.support.DefaultMessageSourceResolvable: codes [echoModel.name,name]; arguments []; default message [name]]; default message [may not be null]] ]

As it stands it doesn’t look great in this format, and that’s where our global exception handler comes in.

Step 3 – Define a Global Exception Handler

We define a global exception handler class that will handle any exceptions.
The initial body should look as follows.

GlobalExceptionHandler.java
@ControllerAdvice
@RestController
@Configuration
public class GlobalExceptionHandler {

}

The important part is the @ControllerAdvice annotation.
It tells Spring that you are interested in any exceptions that might be thrown.

Now we know that we want to deal with a MethodArgumentNotValidException.

So what we need to do is to take the details, from that and put them into our model. This can be done with the following code which creates a specific ExceptionHandler for MethodArgumentNotValidException.

GlobalExceptionHandler.java
@ControllerAdvice
@RestController
@Configuration
public class GlobalExceptionHandler {

  @ExceptionHandler(value = MethodArgumentNotValidException.class)
  @ResponseStatus(HttpStatus.UNPROCESSABLE_ENTITY)
  public ErrorResponseModel handleException(MethodArgumentNotValidException e) {
    List<ErrorModel> errorModels = processErrors(e);
    return ErrorResponseModel
            .builder()
            .errors(errorModels)
            .type(ErrorType.VALIDATION.toString())
            .build();
  }

  private List<ErrorModel> processErrors(MethodArgumentNotValidException e) {
    List<ErrorModel> validationErrorModels = new ArrayList<ErrorModel>();
    for (FieldError fieldError : e.getBindingResult().getFieldErrors()) {
      ErrorModel validationErrorModel = ErrorModel
              .builder()
              .code(fieldError.getCode())
              .source(fieldError.getObjectName() + "/" + fieldError.getField())
              .detail(fieldError.getField() + " " + fieldError.getDefaultMessage())
              .build();
      validationErrorModels.add(validationErrorModel);
    }
    return validationErrorModels;
  }
}

The processErrors block simply takes the details from the MethodArgumentNotValidException and builds the ErrorModel details for us. We then use that to create our ErrorResponseModel.

Now if we run the same test again we get the following.

Bash
$ curl -X POST http://localhost:8080/echo/model -H 'Content-Type: application/json' -d '{"name":null,"message":"This message"}'

{
  "type": "VALIDATION",
  "errors": [
    {
      "code": "NotNull",
      "detail": "name may not be null",
      "source": "echoModel/name"
    }
  ]
}

We now have the target structure we desire. It is much easier to see what went wrong with this message.

Testing Errors in Spring Boot Microservices.

We can add a unit test for this as follows.

MockMvcTest.java
@Test
public void postShouldReturnMessageTooLong() throws Exception {

  String TEST_NAME = "John Dobie";
  String LONG_TEST_MESSAGE = "This message is more than 30 characters long";

  EchoModel echoModel = EchoModel
          .builder()
          .message(LONG_TEST_MESSAGE)
          .name(TEST_NAME)
          .build();

  MvcResult mvcResult = mockMvc
          .perform(post(ECHO_MODEL_ENDPOINT)
                  .accept(MediaType.APPLICATION_JSON)
                  .contentType(MediaType.APPLICATION_JSON)
                  .content(getJsonObjectAsString(echoModel)))
          .andDo(print())
          .andExpect(status().isUnprocessableEntity())
          .andReturn();

  String responseBody = mvcResult.getResponse().getContentAsString();

  ErrorResponseModel errorResponseModel = readJsonAsObject(responseBody, ErrorResponseModel.class);
  assertThat(errorResponseModel.getErrors().size()).isOne();
  assertThat(errorResponseModel.type).isEqualTo(ErrorType.VALIDATION.toString());

  ErrorModel errorModel = errorResponseModel.getErrors().get(0);
          
  assertThat(errorModel.getCode()).isEqualTo("Size");
  assertThat(errorModel.getDetail())
     .isEqualTo("message size must be between 1 and 30");
  assertThat(errorModel.getSource()).isEqualTo("echoModel/message");

}

The test makes a call with a message that is longer than 30 characters.
It then checks that we get back a 422 status and a single error block.

There are other tests in that class to look at.

Adding Other Errors.

Handling any type of exception is now easy. We can just add an additional block to the global exception handler.

I’ve added a couple more in GlobalExceptionHandler.java which you can see being hit in the tests.

Next Steps.

I will shortly publish another blog on showing how you can extend this technique to deal with more complex validations including business validations that require conditional or dependent logic.

In the meantime, you can find more information here.

https://reflectoring.io/bean-validation-with-spring-boot/

https://spring.io/guides/gs/validating-form-input/

https://cheatsheetseries.owasp.org/cheatsheets/Bean_Validation_Cheat_Sheet.html

Other Blogs You May Like

https://johndobie.com/blog/chatgpt-with-java/

Feature Flags in Java Spring

A code example showing a simple way to feature flag in Java and Spring eliminating the code and checks when the flag is disabled.

Overview

There are many ways to do feature flags in Java and Spring and some excellent articles are listed at the bottom of this post.

However where possible this is my favourite technique because it eliminates the usual flag checking for each call.

Instead, the check is done once at start-up and the whole component is either enabled or disabled.

If the flag is disabled, then no further checks are done.

Getting The Code

The example is a simple rest controller that we turn off and on.

You can check out, build, test and run as below.

git clone https://github.com/johndobie/feature-flag.git
mvn clean test spring-boot:run
http://localhost:8080/echo?message=test

Understanding The Example

We use a simple REST Controller that echoes any message that is passed.

EchoController.java
public class EchoController {

    public static final String ECHO_ENDPOINT = "/echo";

    @GetMapping(ECHO_ENDPOINT)
    public String echo(@RequestParam String message) {
        return message;
    }
}

Adding The Flag

We can add the flag echo.enabled as below.

@ConditionalOnProperty
(name = "echo.enabled",  havingingValue="true "matchIfMissing = false)

By default, if that flag is not set to true, the controller will not be enabled.
This is the safest way IMHO.

EchoController.java
@RestController
@ConditionalOnProperty(name = "echo.enabled", havingValue = "true", matchIfMissing = false)
public class EchoController {

    public static final String ECHO_ENDPOINT = "/echo";

    @GetMapping(ECHO_ENDPOINT)
    public String echo(@RequestParam String message) {
        return message;
    }
}

You can change to matchIfMissing to true.
Then the default behaviour will be to always enable the controller, unless the flag is specifically set to false.

Testing With The Flag On

First we can test that with the flag enabled, that the controller is loaded.
@TestPropertySource(properties = {“echo.enabled=true”})

EchoControllerEnabledMvcTest.java
@WebMvcTest(controllers = EchoController.class)
@TestPropertySource(properties = {"echo.enabled=true"})
public class EchoControllerEnabledMvcTest {

    private static final String MESSAGE = "Hello, World";

    @Autowired
    private MockMvc mockMvc;

    @Test
    public void getShouldReturnMessage() throws Exception {
        this.mockMvc
                .perform(get(ECHO_ENDPOINT)
                        .param("message", MESSAGE))
                .andDo(print())
                .andExpect(status().isOk())
                .andExpect(content().string(containsString(MESSAGE)));
    }

}

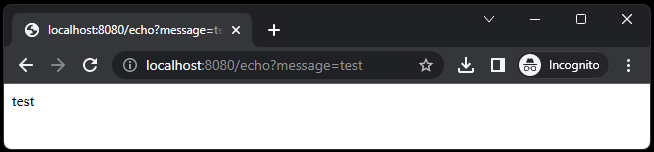
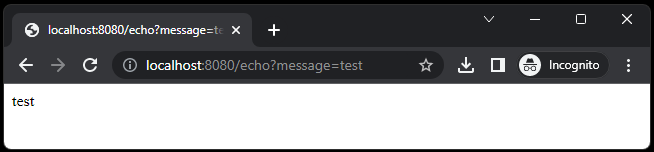
We can see that the message is successfully echoed from the controller

Testing With The Flag Off

A similar test can be used to check we get an error when the flag is disabled.
@TestPropertySource(properties = {“echo.enabled=false”})

EchoController.java
@WebMvcTest(controllers = EchoController.class)
@TestPropertySource(properties = {"echo.enabled=false"})
public class EchoControllerDisabledMvcTest {

    private static final String MESSAGE = "Hello, World";

    @Autowired
    private MockMvc mockMvc;

    @Test
    public void getShouldReturnError() throws Exception {
        this.mockMvc
                .perform(get(ECHO_ENDPOINT)
                        .param("message", MESSAGE))
                .andDo(print())
                .andExpect(status().is4xxClientError());
    }

}
ShellScript

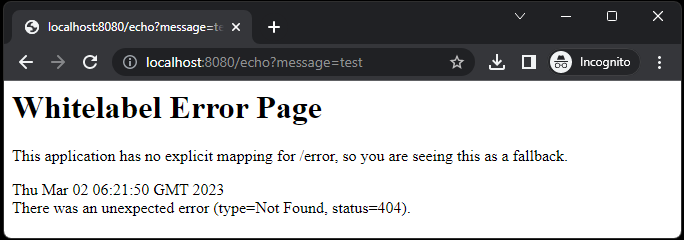
In this case an error is returned because the controller does not exist.

Running The Application Standalone

When running the application the flag is set in properties as below.

application.properties
echo.enabled=true

You can then test as follows.

mvn spring-boot:run
feature flag enabled

Then disable the feature and start again
echo.enabled=false

feature flag disabled

Wrap up

This is a great way to implement feature flags that will only run at start-up.

This technique cannot be used in all circumstances, but is great for situations where you want to enable or disable whole components.

Further Info

Check out these resources for more detailed info on feature flags

https://martinfowler.com/articles/feature-toggles.html

https://www.baeldung.com/spring-feature-flags

« Older posts

© 2026 John Dobie

Theme by Anders Norén — Up ↑